OVERVIEW:
The following journal outlines the various steps and evaluation of the process of ASSESSMENT TASK #2- Studio Studies. The contents of this journal includes the following
-
1.1: CREATE A 3D COMPUTER MODEL RESPONDING TO THE THEME ‘STEREO’
-
1.2: CREATE A 3D PRINT OF A SIMPLE GEOMETRIC PROTOTYPE
-
1.3: CREATE A DROP OUT PLASTER MOULD FROM THE PROTOTYPE
-
1.4: CREATE 4 SLIP CAST FORMS FROM THE PLASTER MOULD
-
1.5: EXPERIMENTATION WITH TESSELLATION,COLOURED SLIP AND GLAZES
-
1.6: DISPLAY FOUR OBJECTS FOR ASSESSMENT
-
1.7: CREATE AN A3 POSTER OF PROCESS
-
2.0: FIVE COLOUR GRADIENT “LINE BLEND’ GLAZE TEST
-
3.0: SHORT QUIZ ON FUNDAMENTAL CERAMIC TERMS
-
4.0: KILN PACKING/ FIRING PRINCIPLES AND PRACTICE
Printed A3 poster of Exercise 1 plus studio examples and journal submitted in WK8 class.
Week 1 ( beginning Monday 25th July)
EVALUATION:
Slip cast a tile or flat surfaced form using one of the studio plaster moulds.
I used a variety of underglazes in class today and experimented with the application of both scraffitto and painted patterns using a variety of the the studios underglazes.
Once I put them into the kiln and fired they did break up, but a worthwhile exercise for the samples none the less. I used clear glaze on all of them and was pleased with the results.

Later I slipped cast a number of tiles and had variable success. I enjoyed the process but had to ask other students if I was casting correctly as I was not clear on exactly what to do. Two of the tiles that I created cracked in the corners during the drying process in the mold.
The third tile, whilst trying to dig out the plugs, I inadvertently punctured a hole in the surface. My casting technique is still to be refined. I painted a variety of underglazes onto the dried tiles and experimented with a variety of techniques. Once done it was bisque fired. I dipped the bisqued tile into the Satin Glaze bucket and fired this again. I was very disappointed in the results. The colour surface was significantly dulled and the surface texture became muddied. Not sure why this happened! I must use the clear glaze next time.


Before glazing and after glazing shots. Very disappointed in the results. Is there something wrong with the satin glaze on under glaze finishes? or was it my application of the Satin Glaze itself?
Week 2 ( beginning Monday 01 Aug)
Slip decorating techniques and basic glaze application.
COMPUTER WORKSHOP:
Workshops for 3D modelling, 3D printing and template creation are offered at the following times in Computer Laba D210 Tuesday 9-10am, D202 1-2pm , D210 Friday 1-2pm.
EVALUATION:
1.1: CREATE A 3D COMPUTER MODEL RESPONDING TO THE THEME ‘STEREO’
FORM Z-3D Design


Various Images of my Form Z file including STI file
The prototype fit into a 132 x 120mm x 138mm cube and included at least one face with a straight edge. My completed design was a little bigger than was outlined in the brief. I managed to export the STI file and upload to 3D Hubs. What was unexpected was the exorbitant cost to have it printed! I was quoted initially $2000! Since I was pushing for time and most printers took 10 days to print I compromised with a pro lab in Surry Hills with a turnaround of two days. At $250 plus GST it was a very expensive experience!

“In 1833, an English scientist Charles Wheatstone, discovered that because human eyes are not at exactly the same place, objects viewed through eyes are not the same, thus creating an illusion of depth. And five years later, according to what he discovered, he invented the stereoscope. Stereoscope is a binocular device through which a pair of monocular images was projected to both eyes in such a way that the optic axes converge at the same angle, which gave the impression of a solid 3D image. Since then, people started to have a concept of stereo view.”
Week 3 ( beginning Monday 08 Aug)
TOPIC: The Model and the Prototype
Create a 3d computer model and 3d print a simple geometric prototype that responds to an interpretation of the concept ‘stereo’. The prototype should fit within a 120 x 120 mm x 120mm cube and must include at least one face with a straight edge.
1.2: 3D PRINT A SIMPLE GEOMETRIC PROTOTYPE
After a very painful, time consuming and expensive process the prototype was complete! The material was PLA plastic. Looks very snazzy! This will go on the mantlepiece at home.


The prototype now needed to be prepared for casting. I spent a number of hours sanding and undercoating the shape in white gesso. Each layer was dried in the cabinet until the surface was well covered and smooth. Apparently the porous surface of the plastic would pick up the plaster during casting. However, I’ve later heard that a good sanding is all that is required to prepare the PLA prototype. Live and learn! I received help from the teacher who ran the Friday class. She was very helpful and patient!
Week 4 (beginning Monday 15th August)
TOPIC: Model and Mould Making for Slip Casting
Demonstrations in Studio
- Mould Making Technology – Working with Plaster.
- Model Making – Casting a one piece plaster mould from a 3D model
Make a dropout plaster mould from the prototype
1.3: CREATE A DROP OUT PLASTER MOULD FROM THE PROTOTYPE
PREPARATION FOR CASTING:
Well what started out as a hopeful experience ended up as a minor disaster. As mentioned the Friday afternoon educator answered my many probing questions as I felt so unsure of what I was doing. She advised me to puncture a hole into the base of the prototype with a piece of wire to enable the air to escape when removing the prototype once the plaster mold had dried. She also told me to spray the shape with the the canned wax a number of times to ensure the shape would come away easily. As nervous as I was I followed her advice.
The teacher further demonstrated how to add a thin layer of clay to the board to securing the prototype to enable a space between the board and to prevent the plaster from seeping through.She then demonstrated how to secure the cottle in place with a wall of clay. The wire was to stick out of the top of the plaster allowing its later easy removal.
During David’s demonstration in class, I videoed the procedure, however I missed the last part of his presentation as my battery ran out. My plaster preparation was guided by the recipe on the wall which I followed. Again I was assisted by another lovely student who was working in the class for the finer points such as how much plaster and when to pour.
PLASTER POUR
Everything was going so well, but then I came unstuck during the plaster pouring process. As I poured the plaster from the bucket, the plaster leaked everywhere from underneath my cottle as my clay wall was not secured enough to the board. Even though I tried my hardest to dam the flow of the white ooze, on my subsequent pour the plaster kept coming from under the cottle onto the floor and table like a dam breaking its banks . By the time I had sufficiently stemmed the flow, the plaster had began to harden in the bucket so it was a plopping mess that enclosed my precious prototype. Apart from the river of plaster mess that covered the floor, the bench and myself I was so relieved to have this done! I left the mold in place over the weekend to harden and had recurrent nightmares that everything would go to put once the cottle was removed.
The world did not end which is important to note! The mould took a few more days to dry completely due to its size and was left in the drying cabinet during this time. I was guided by Petra by the curing time.
PLASTER PREP TIME: 2.5 HOURS
DRYING TIME: 4 days
NERVOUS ENERGY: Constant
THE REMOVAL OF THE PROTOTYPE
The next adventure begins! Getting the prototype out required a level of patience and care. I firstly removed the wire-no big deal! I then used the pressurized air gun to slowly remove my precious prototype from its encasing. After careful pushing and shoving and blasting it eventually came out. I followed all safety procedures including the wearing of a dust mask, eye glasses and headphones.
Following this was the careful sanding of the interior of the mould and the patch job of the air holes created with additional plaster to ensure a smooth surface while casting. However, the surface seemed very brittle and no matter how much I smoothed it seemed certain parts of the mould would come away.
REMOVAL OF PROTOTYPE: One hour
PREPARATION OF MOLD: One hour (Plus 30 minutes drying time)
MY LEARNING:
- Go easy on the plaster! Do the math before hand and calculate the volume of plaster required. MUST BE MATHEMATICAL iN PROCESS.
- Be over prepared in the preparation of the cottle and use plenty of clay to dam the outside wall.
- Pour a small amount of plaster into the cottle before committing to the process.
- Work with another person (ESSENTIAL).
- Allow plenty of time for the preparation and drying of the mould. This was the main take away.
Week 5 (beginning Monday 22th August)
TOPIC:Casting Technology- Balancing liquid casting slip
Slip Casting Demonstrations in Studio .
1.4: CREATE 4 SLIP CAST FORMS FROM THE PLASTER MOULD


My first attempt at slip casting was a bit of a disaster. I asked Petra for advice on how long to leave the slip in the mould before removing the shape. She obviously misunderstood what I was asking and said “two hours” so that is what I did. My first result was a blobby, sluggish fat cast. Obviously not okay. Once I worked out the process and received further clarification I was on my way to systemise my process.
METHOD
- Each slip cast was methodically sieved and stirred before pouring.
- The mold itself cleaned of any flaky bits (There was alot!).
- I recorded the time exactly for each casting before pouring out the slip to maintain consistency. 20 minutes.
- I left the mold upside down on the grate for 45 minutes for each cast.
- I gently scraped away excess clay at the top of the mould at this time. I left the clay form sit inside the plaster mould for a further 20 minutes before I gently removed it.
- I gently cleaned away any bumps with a wet sponge at this stage. I was a little eager here at times damaging the form slightly
- I then left the pots to dry for at least two-three days before I touched them and smoothed them again. Ensuring they were dry enough to bisq fire.
- Once bisqued, time is needed for glazing, drying time, cleanning bottom of pots of unwanted glaze and then back to the kiln.
CASTING TIME TOTAL: 2-2.5 HOURS
DRYING TIME: 2-3 days
BISQUE/ FIRING TIME: 2 days
GLAZING/REFIRING: 2 days
TEMPERAMENT: Very patient!
Week 6 (beginning Mon 29 Aug)
LECTURE: Assessment Task 3 introduction: Horror Vacui
Demonstration : Line Blend glaze testing and simple glaze application
2.0: FIVE COLOUR GRADIENT “LINE BLEND’ GLAZE TEST
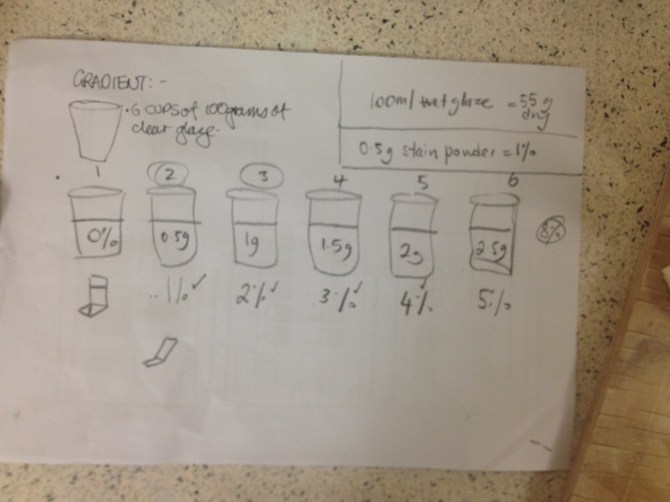
I missed the lecture on this process so was really in the dark on what to do. I was kindly assisted by two student in the class who pointed me in the right direction and showed my how to measure the clear glaze, set the scales and measure and add the stain powder. I would have been lost without their help. This process seems different to the one that provided on Moodle.
I followed the instructions they shared and photographed the results as seen in the slideshow below. Once the elbows were fired I put together the final board below.I have again used this process in my preparation of adding stain powder to clay slip and observed the stark difference in the colour intensity even though I used the same proportions in the mixture.
MY RECIPE
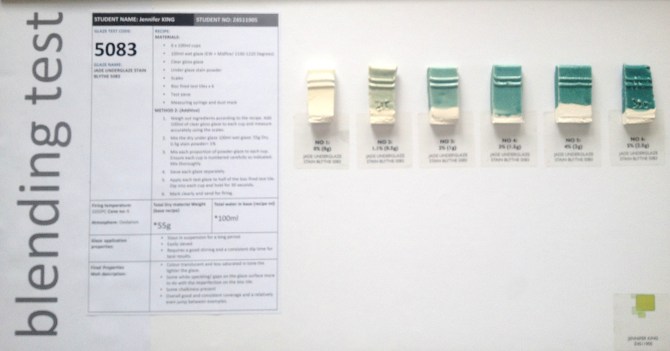
Completed blending test board
3.0: SHORT QUIZ ON FUNDAMENTAL CERAMIC TERMS
Successful complete (pass) a short quizz on Fundamental Ceramic terms, studio materials and processes. The quizz will be available for completion until the night before assessment in week 8.
I did not get to complete this task due to my absence and resulting commitments to my family the quizz was closed before I got to it. I will endeavour to seek permission to complete this for my own sake once back in class.
4.0: KILN PACKING/ FIRING PRINCIPLES AND PRACTICE
Successfully complete (pass) a safe operations and maintenance induction competency for one of the following studio activities. ( if you have already completed one of these proficiencies in another course, choose a different one)
• Kiln packing / firing principles and practice.
I successfully completed this induction and helped to carefully pack and unpack two different kilns.
Week 7 (beginning Mon 5 Sept)
1.5: TESSELLATION POSSIBILITIES EXPERIMENTATION WITH COLOURED SLIP AND GLAZES
Explore the tessellation possibilities of your forms, using fired finished that employ transfer printed graphic treatments
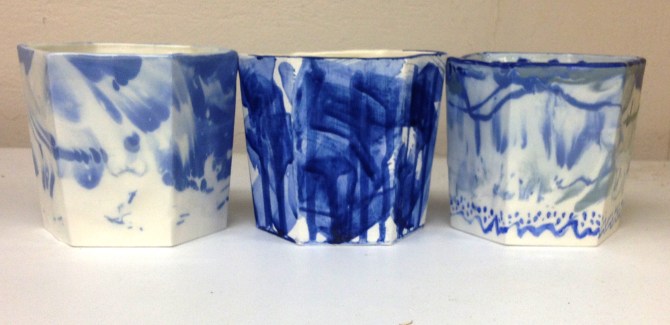
EXAMPLES 1&2:


in blue underglaze.


I applied the glaze randomly with a thick brush and used the dropper for a random effect.
EXAMPLE 4 ACCIDENT:
In my haste to get the final pot covered in an underglaze pattern before I bisque fired it, I damaged it and broke it.SCREAM and cry which did not fix it. I decided to cut my losses and not complete the final pot as time had well and truly run out. I did not realise until much later that I could have fixed this with slip!I realised I was biting off more than I could chew with my ambitions and should have repeated the painted glaze process for this pot. Live and learn!


Week 8 (beginning Mon 12 Sept)
Display the following work for assessment:
1.6: DISPLAY FOUR OBJECTS FOR ASSESSMENT


1.7: CREATE AN A3 POSTER OF PROCESS
Create an A3 poster outlining ‘concept’, ‘technical’ process and ‘presentation’.Include in your poster a photograph visualising an individual tessellation /presentation arrangement.
2.0: Completed fired exercises plus glaze tests, quizz & proficiency completion.
3.0 : 2 x A3 concept posters/boards for Assessment task #3


For further detail see Ass#3 horror Vacui Journal entry in wk 8.
